Showing posts with label appy classrooms. Show all posts

Appy Classrooms {Word Clouds}

Hi all!  I'm back to share a super easy but very useful app for your classroom!

App Name: Word Clouds
Cost: FREE
Here's what you will look for:

This is app is very simple to use.  Students simply type in words to show up in a "cloud" format.  The more times a word is typed, the larger it will appear in the cloud (very similar to the Wordle site if you have used that).  Students then have the option to change the font, color pattern, or layout design.

Here are some ways we use this app in my classroom.

As we studied adjectives, students worked in pairs to create a word cloud of adjectives using the five senses - How does it taste, look, feel, smell, and sound?


This led into our next session on adverbs.  Students were given a verb which they typed in 8 times (to make the verb larger) and then typed in adjectives describing how, when, or where that verb happened.


A science use is to give students a topic, in this case an animal classification group (mammals) and have students create a cloud of words associated with it.


My favorite way to use Word Clouds though is for student birthdays.  For this, I set one iPad out and type the birthday child's name eight times (to ensure it is large).  Then, students go one at a time throughout the day and add a character trait that describes the birthday child.  If character traits are repeated, it's okay - those words will appear larger.  Once all students have typed a trait, I quickly make the cloud (but you could also let the birthday child do this) and let them upload it to their Seesaw portfolio.  I'm also considering printing them out to frame as end of the year gifts.  I've done word cloud frames as gifts before at the end of the year and the fact that the clouds will all be done for me as an added bonus! <3


Since character traits are something we are really just starting to learn about in 2nd grade, I do post a {positive} character traits sign in the room for those students who may need the support (or help spelling their word).  You can grab my character trait signs (both positive and negative) FREE in my shop by clicking the link below!


3

Appy Classrooms {Money App}


When I begin a new unit in my classroom, I immediately start searching for an engaging app to integrate.  To be honest, I was very disappointed in the engagement factor of most of the money apps I came across.  That is, until I found this Money Bingo app.  I love it for many reasons!  Let's take a look.

App Name:  Money Bingo
Price: $1.99 in the Apple store
What to Look for:

I know, I know....an app that's not FREE?  Is it really worth it?  In my opinion, absolutely - it is one of the best thought out practice apps that I've come across!  Other money apps haven't held my students attention for more than a few minutes.  This one, they're purchasing at home to play!


To begin, simply hit start!  I turned the volume off, but there are options to click on coins to have them named and their values told.  When you use this option, students just double tap the coin and it will say, "Quarter, 25 cents" and then the coin will flip over to reveal the opposite side - super helpful!


The first time a student plays, he/she will click "new player" and type a player name.


They will also select their gender (this is because they will create a character) and click next.


There are many character options - MANY.  Students will first select their head from ones with various hairstyles and skin colors.  Then, they will select their own clothes, from pirate wear to regular wear there is something for everyone!

Students have three buttons to choose from - Bingo, Practice, and Fish Tank.  The ultimate goal in this game is to build your own fish tank.


Students can play Bingo to earn fish for their fish tanks!  There are several different levels to help differentiate for your students.  My students love challenging themselves here. :)


After selecting the level, you also have several different grid options.  This helps to differentiate even more.


To play the Bingo game, students must count the coins in the white space.  The pencil and eraser come in handy, especially for the harder levels, so students can write down their dollars before moving on to count the change.  Once students know the amount, they click on the matching amount on the gameboard.  Then, a new set of coins appear.  Fish pop up to cover the correct answers until students have three in a row (on this game board....more on the higher grids).


Once BINGO is achieved, students earn a new fish for their tank.  It also gives them a score based on the seconds it took them to get BINGO.  This score will show on their leader board, motivating them to try to beat that score the next time.


The other option, is to play in Practice Mode.  During this mode, students are given a money amount at the top of the white space (53 cents on this example) and are required to drag money from the left side onto the white board to make that amount.  Then, they click "check" to see if they are correct. 


The goal is for students to get 10 correct.  Once they have 10 correct they WIN all of the money they counted.


Once students have won money, they are able to shop for items to go in their fish tanks.  They can only purchase one item at a time, which I love....it makes sure they don't spend too long shopping!  HOWEVER, students aren't guaranteed to receive the item they purchase.  First, students must solve a word problem.  If they get the word problem correct, they receive the item.  If they do not solve it correctly....wait for it....they LOSE ALL OF THEIR MONEY!  This is my students favorite part...and the teacher loves that word problems are integrated!!!!


Students use their fingers to write on the notebook paper to solve the problem.  You don't have to worry about them using the calculator - there's not addition or subtraction sign on it.  The calculator is simply for them to input their final answer and {hold breath} hit enter to see if they are correct.


If correct, students are taken to their fish tank so they can position their new item how they want.  While there, they can double tap the screen to drop a piece of fish food in the tank and watch their pets swim to get it.  Then, they click the back arrow and keep playing!

I hope that your students love this app as much as mine!  Creating #appyclassrooms one app at a time!


4

Appy Classrooms {Digital Portfolios}

Have you searched for an easy way for students to keep individual portfolios?  Looking for a way to make student-led conferences easier?  I have the app for you today!


App Name:  SeeSaw
You can find it in the app store for FREE!
Here's what you will look for:


The fact that this app is a free tool for teachers is simply amazing!
You will set up a class account.  When you do, you will decide if you want your students to add work to their portfolios using their own email address (intermediate students) or have them sign-in using a class QR code (suggested for primary students).  I chose the QR code.  A sign to post in my classroom containing our QR code was sent to me immediately after choosing this option.

When students open the SeeSaw app, this is what it looks like.  They simply choose "I'm a Student."


Then they will be prompted to scan the class QR code.  I printed four of the signs and posted them around our classroom for easy access.  The great thing is, you don't need to add a QR reader to your ipads - this is built right into the app!


After scanning the QR code, this screen pops up.  Students simply select what it is they want to upload to their portfolio!  I mean, just look at those options!!  

Seriously, let's take a look at each of them.

PHOTO:  If students select this option, the camera is on and ready for them to use.  They simply snap a photo.  But THEN, they have the option to draw over the photo, record a narration of the photo, add text to the photo, or rotate the photo.

VIDEO:  If students select this option, the video function automatically begins.  Students have the option to add text to the video once it is finished.

DRAWING:  If students select this option, a white screen with drawing tools pops up.  They simply use their finger to draw on the screen.  What a wonderful and quick way to assess understanding!  How much do you love the fact that students can record a narration to explain their drawing??


NOTE:  If students select this option, a notebook paper background pops up with the keyboard so they can take notes.


LINK:  The link option lets students paste a link they've previously copied to their clipboard to their portfolios.

Speaking of adding their work to their portfolios, just HOW do they do that?  When a student is ready to add one of the above options to their portfolio, they just click on that green plus circle to "add" the work to a portfolio.  A list of students' names pops up and they select their own name.  You can see that the work below was added to Madison's portfolio.


Do you notice how there is a "like" and "comment" button underneath her work?  This is so that others can give her feedback on her work!  How cool is that?  It is important to note that no work can be added to portfolios without going through teacher approval first.  And, no comments can be added without teacher approval.  So, just who comments?  As a teacher, I can comment on all student work that is added.  Classmates can also add comments to each others' work when viewing the class feed.  AND, if you have given parents access, they will be able to comment on their own child's work (that is the only work they are able to see).  You know students just eat this up, right?!  Knowing mom and dad can send them notes about their work during school hours!  #socool

If you want to give parents access to students' portfolios, it's super easy!  You can print out letters in your teacher account to send home with students.  They will give parents step-by-step instructions (including a QR code to make it super easy) for signing on.  Just print and send home.


This is a look at SeeSaw from my teacher's account.   You can see that it says I have "1 unapproved item."  This means a student submitted work to their portfolio, but before being added it is pending my approval.   I simply click on "unapproved items" and the work will appear on my ipad.


I can click the green check to approve it or the red x to dismiss it.  

There's much more to SeeSaw if you're interested!  Students can have folders for different subjects to make organizing their work in their portfolios a breeze.  You can even set up a class seesaw blog where parents can see the work.  I would suggest downloading this app and playing around with it to get comfortable.  I'm positive that it will be a beneficial tool for you and your students!

Join me again soon for more ways to create #appyclassrooms!  Use this hashtag on Instagram when sharing apps so we can see how you are using apps in your classroom!


2

Appy Classrooms {Literably: Automated Running Records}

This app is "literably" the most amazing resource for running records EVER!

App Name: Literably
Here's what you'll be looking for in the app store.  It's FREE!


What is it?
 
This app is pretty much a teacher's dream when it comes to running records.  It was designed to do ALL of the work for you so that you are not taken away from instructional time to benchmark!  Can I get a hallelujah?!

How do I get started?

You will need to register and insert all of your students' names on the Literably website.  It takes 2 minutes...literably. (See what I did there?!)
Simply enter your email.  I used my school email.  You'll want to use whatever email you want your students' results sent to.  

Then, you'll create a username - pick one that your students will remember.  I used my last name and our room number.  They will enter this when they login.  Create a password that is just for you.

Next, enter your students' names.  I entered first names only.  Easy peasy!

It is important to note that the teacher dashboard can only be accessed online (not using the app).  Here's a peek at my dashboard.


You select the level (A to Z) to assess students on and then if you'd like to assess using a fiction or nonfiction text. 


How does it work?

Once students open the app, they will enter your username.  Then student names will appear and they'll choose their own name.  Then, a story will pop up for them to read.

When students are ready to begin, they'll click the "start" button at the top.  The app will record them reading it.  The default is set to record for 1 minute (though, you can change this in your settings).  After one minute, a pop-up will appear.  Students will hit "continue" to keep reading the story in their heads.

At the end of the text, students will click the "comprehension" button in the top left corner.


Five comprehension questions will follow.  Students can click the speaker icons to have the questions and answers read to them.

At the end of the five questions, a summary page will appear asking students to tell about the passage they just read.


When ready, they will hit "record response" and again they are recorded speaking.  At the end, they simply select "log out" to finish.


What happens next?

Next, is when the REAL magic happens.  Once scored (usually a couple of hours later), you will receive an email letting you know the student's record is ready. You can click on the link in the email or head back to the website to view your dashboard.  What awaits is simply AMAZING!
The app not only sends you the ACTUAL RECORDING of the student reading and summarizing the story so you can go back and listen to the reading, but it sends you the actual running record....COMPLETED!  That's right, the text with all of the markups, the errors analyzed, the accuracy rate, the fluency rate, the self-corrections....everything.  Done FOR you. Is that singing I hear?!

The above record is one I did as a "demo student" to really test out the app.  It was incredible.  It marked the text up JUST as I read it.  Absolutely amazing!

Important to Know:
While the app is free to download, you are limited to 10 students per month.  If you want to test more than that, you need to inquire with them about pricing.  Pricing depends on the number of students who will be using it and the frequency of which it will be used.  However, with 10 FREE students per month, what an amazing resource to track those students who need it most!
I hope you'll check out this app and let me know if you are as impressed as me!  I'll be back soon with another app to make your classroom an #appyclassroom!


15

Appy Classrooms {Shadow Puppet}

I'm here to bring you another amazing app to use in your classroom today!  


App Name:  Shadow Puppet
Here's what you'll be looking for in the app store.  It's FREE!


I actually stumbled upon this app by mistake.  I was searching for a puppet app to use and this popped up.  It is not a puppet app, but no worries - it's even better!  I think the name comes from the fact that it is a digital storytelling app.

What is it?
I like to think of this app as a new way to create slideshows.  Think PowerPoint, but much simpler and quicker and using voice to narrate it instead of being text intensive.  Students use images (their own or from the web) to create slideshows that they narrate to tell a story.


What are some ways it could be used?
 Due to the simplicity of this app, it could be used in SO many ways.  Here are a few ideas.

Reading/Writing
Take pictures of students' original published books and let them read them!

Math
Have students take pictures of shapes in the real world and explain them.
Let students solve the same math problem in different ways and explain.

Science
Take pictures of STEM projects and let students narrate their thought process during the stages.
Take pictures of weather/clouds for students to tell what they know.

Social Studies
Let students locate pictures of famous places, landmarks, or people in history to narrate a tour of a particular city/state.

Community Building
Students can create slideshows of pictures that represent themselves as introductions at the beginning of the school year.

{EXAMPLE}


How does it work?
It really is SO easy!  My 2nd graders picked it all up on day ONE!
 This is what the app looks like when you open it.  It shows any existing slideshows and has the "create new" slideshow button.  Simply click that button to begin.


The app defaults to your camera roll, so you can see lots of pictures of my students showing.  If students were using pictures that they had taken, they would select them here.  If they want to find images from an outer source, they would simply select that source on the left.  I usually have my students search the sites under "IMAGE SEARCH."


Image Search is my most favorite thing about this app!!  When my students create PowerPoints, it's such a pain for them to find images.  Not with this app!  Simply click Web Images, Flickr Creative Commons, or Wikimedia Commons - all without leaving the app!!  #LOVE  Students simply type their search term into the top search box and choices appear!  I will say that I think the reason you need to download the "Edu" version of Shadow Puppet may be for the filtering.  I was a little concerned when my students were creating region slideshows and one group wanted to talk about Mardi Gras in Louisiana.  I searched it myself first and all of the images were fine! {whew}


Once an image is selected, students can simply type a new search word to add more images.  Once all images are inserted, they will click the "next" button at the bottom.


Then, the first image in the slideshow will appear.  At this point, students can name their slideshow by clicking the little pencil above the image.  They can also use the T button to the right to add text to the picture, or the music note button to add music to their slideshow.


Students can use the top right menu button to add pages, reorder pages, or delete pages.  They can also go here to "save draft" at any point if they need to leave the project and come back to it later.  Or, they have the option to delete the project altogether.  If they are ready to narrate their project, they simply click the START button at the bottom.


After narrating all of their slides, students will click the SAVE button.  This automatically saves the slideshow in the app.  If students mess up while recording one of the slides, they can simply click UNDO on the left.  This will only delete the narration of this single slide.


After saving the project, a Preview/Save pop-up will appear.  Students can click on the slideshow to preview it.  They also have the option to save it to other places - don't worry, a "grownups only" pop-up appears on many of these choices!  But, if you use the SeeSaw Digital Portfolio app, you will love this!  Your students can save their projects directly into their portfolios!!!!


 Need even more ideas?  The app has pages and pages of ideas for classroom use! 

 Helpful Hint:
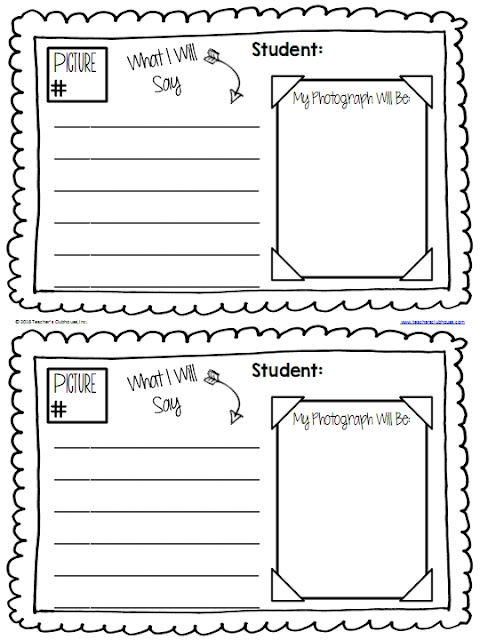
I've found that students are much more successful if they have a plan before creating and narrating their shows.  Therefore, I created these simple planning pages for my students to use.  They write what they're going to say and write/draw what they are going to use as a picture/photo.  You can download this planning page below to use with your students.

https://drive.google.com/file/d/0B7-RC8er5CXTTEQta1AzaXFFVGs/view?usp=sharing
{Download Here}


So, what are you waiting for?  Go download this FREE app and let your students start creating!


4
Back to Top